Самый дешевый пол — как его выбрать? (45 фото идей)
Несмотря на то, что ковровые и деревянные напольные покрытия являются одними из самых красивых, все же они относятся к довольно высокой ценовой категории. Поэтому далеко не каждый может позволить себе подобную роскошь.
Однако, на сегодняшний день на рынке материалов можно найти прекрасное решение для этой проблемы, ведь появилось множество материалов, которые выглядят также интересно, но имеют более доступную стоимость.
Подобный материал смогут приобрести и те семьи, у которых бюджет довольно небольшой. В этой статье мы рассмотрим несколько основных видов напольных покрытий и поведаем вам, какой самый дешевый пол можно найти на рынке и как не ошибиться с выбором.
Оглавление статьи:
Ковровые покрытия
Стоит сразу отметить, что далеко не все виды ковровых покрытий относятся к высокому ценовому сегменту. Существует множество бюджетных вариантов, которые и по внешнему виду, и по стоимости являются более чем приемлемыми.
К тому же не стоит забывать о том, что зачастую магазины предоставляют скидку на свою продукцию, как постоянным покупателям, так и тем, кто совершает покупку у них впервые.
В отдельных случаях стоит попробовать вариант с приобретением одного ковра средних размеров и просто с его помощью замаскировать имеющийся проблемный участок.
Бамбуковый паркет
Если вам нужен самый дешевый пол, то стоит задуматься о приобретении бамбукового паркета. Наверняка многие привыкли считать бамбук деревом, но на самом же деле это просто трава, именно поэтому данный вариант буде наиболее экономически выгодным.
Неоспоримым плюсом данного материала является то, что внешне он очень сильно похож на аналог из дерева, однако, его стоимость на порядок ниже. Такая серьезная разница в стоимости обусловлена тем, что данному материалу для роста будет достаточно всего трех лет, в то время как дереву понадобиться около пятидесяти.
Бетонный наливной пол
Некоторым может показаться, что вид у бетонного покрытия какой-то незавершенный, однако, при умелом дизайне можно добиться неповторимого эффекта. Бетонный пол будет прекрасно смотреться с витражами и росписью, которую можно сделать в стиле, идеально подходящем для общего интерьера помещения.
А также стоит учитывать и то, что у данного покрытия существует множество разновидностей. Поэтому можно с уверенностью сказать, что каждый покупатель сможет найти такой вариант, который полностью его удовлетворит.
Несомненными плюсами бетонного пола является его простота в эксплуатации, ведь он совершенно не требует никакого дополнительного ухода, и то, что его могут использовать люди с аллергией на пыль, которая довольно часто скапливается в коврах.
Пробковые плитки
Их главным отличием от линолеума является то, что они обладают более натуральным внешним видом и имеют большую мягкость. Если сравнивать их с остальными типами натурального покрытия, то можно с уверенностью сказать, что они представляют собой самое дешевое покрытие для пола.
Если вы решились приобрести именно их, то проблем с выбором у вас не возникнет, ведь цветовая гамма изделий включает в себя множество цветов и оттенков. Поэтому для любого интерьера можно будет подобрать что-то, что впишется в него.
Самоклеющиеся плитки ПВХ
Очень просты в монтаже, поскольку не требуют никаких особых навыков и инструментов, поэтому вы можете самостоятельно заняться их установкой. Все, что вам необходимо будет сделать, так это оторвать защитную пленку, которой покрыты плитки, и приклеить их в нужном вам месте.
Однако, прежде чем приступить к их монтажу, следует тщательно очистить от пыли и любых других загрязнений поверхность, к которой будет крепиться материал.
Обратите внимание на то, что у данного материала имеется не только обширная цветовая гамма, но различная текстура, размер. Поэтому у покупателей появляется возможность комбинировать несколько цветов, создавать напольные рисунки и не только, ведь можно даже поэкспериментировать с текстурами.
К примеру, вы можете создать не идеально ровную поверхность, а с небольшими неровностями. Необходимо лишь выбрать наиболее приемлемый дизайн и начать творить, давая волю фантазии.
Керамическая плитка
Безусловно, используя керамическую плитку можно серьезно сэкономить, но при этом стоит учитывать, что зачастую ее кладут лишь в ванной комнате и на кухне. Поскольку ее использование по всей площади квартиры создаст довольно странный дизайн, который будет больше подходить общественному месту, а не дому.
Приемлемым вариантом, в случае если вы все же вознамерились положить плитку не только в вышеуказанных комнатах, является ее комбинирование с другими видами напольных покрытий.
С ее помощью можно будет составить причудливые узоры и мозаичные сюжеты, которые не только украсят интерьер, но и сделают его неповторимым.
Фото самого дешевого пола
«Чем покрыть пол?» – Яндекс.Кью
О напольных покрытиях существует множество самых разнообразных мифов.
Так, из-за недобросовестного маркетинга производителей очень многие люди думают, что ламинат качественнее паркетной доски.
Однако сравнивать ламинат с паркетной доской — это то же самое, что сравнивать автомобиль с породистым арабским скакуном. По факту, автомобиль имеет лучшие технические характеристики, чем лошадь, но по стоимости и элитности будет явно проигрывать ей. Так и более “выигрышный” во многих отношениях ламинат будет дешевле натуральной и престижной паркетной доски.
Нередко производители утверждают, что срок эксплуатации паркетной доски такой же, как и у качественного ламината — 25 лет. Но по факту, у них просто разные условия эксплуатации. Если паркетную доску эксплуатировать по тем же параметрам, что и ламинат, то она придет в негодность намного раньше.
Среди очевидных минусов паркета — он легче царапается, более требователен к характеристикам помещения и капризен в уходе.
Если вы выбираете пол в квартиру и хотите добиться максимальных технических характеристик, то отличным выбором станет современное напольное покрытие — кварц-виниловая плитка. Оно превосходит по своим свойствам и паркет, и ламинат, уступая последнему только в царапоустойчивости. В квартире этот параметр не так важен, ведь навряд ли вы будете ходить дома в обуви по полу, на котором рассыпан песок.
В коммерческих же помещениях с высокой проходимостью и редкой уборкой предпочтительнее выбрать ламинат (но, опять же, ламинаты бывают разные, в том числе, с достаточно низкой царапоустойчивостью), так как мелкий абразив сильнее воздействует именно на кварц-винил.
Среди плюсов кварц-виниловой плитки можно отметить ударопрочность. Но, как и любое другое покрытие, он боится падения острых предметов.
Кварц-винил более теплый по ощущениям и по нему приятно ходить босиком, он не боится перепадов влажности, вследствие чего не скрипит, а также может дольше сохранять свои качества.
Более подробно об этом материале вы можете узнать из нашей статьи https://skill-spb.ru/Kvarts-vinilovaya-plitka.html#desc.
Однако оптимальнее будет обратиться с вопросом о выборе напольного покрытия в любой специализированный магазин в вашем городе. В отличие от гипермаркетов, профмагазины тщательнее следят за качеством реализуемой продукции, а также могут дать полноценные консультации по всему ассортименту.
Полы бывают разные: бетонные, деревянные, наливные и т.д. И к каждому из них лучше всего подходят свои, специфичные покрытия. О том, чем недорого покрыть пол, как лучше сочетать вид покрытия с материалом пола, пойдёт речь в предлагаемой статье.
Чем покрыть деревянный пол
Деревянный пол принято покрывать краской, лаком, олифой. С недавних пор выявилась тенденция пропитывать деревянный пол маслом, смешанным с натуральным воском. Такой вариант позволяет не только лучшим образом выявить текстуру дерева, но и делает покрытие приятным для ходьбы босыми ногами.
Пол из лиственницыНо ведь и древесина древесине рознь! К примеру, вопрос «Чем покрыть пол из лиственницы?» — лишен смысла по той простой причине, что лиственница не нуждается покрытии! У нее прекрасный внешний вид, она не подвержена гниению, смола лиственничного дерева обладает антисептическими свойствами и поэтому лиственничные доски не боятся атак насекомых-древоточцев! Лиственнице не страшна вода, она плохо горит и т.д.!
Мало того, в виду высокой плотности древесины лиственницы ее и невозможно пропитать или грунтовать! Тем не менее, настойчивость рекламы производителей разного рода «химии» такова, что рядовой обыватель мается, то пропитывая лиственницу морилкой, то нанося какие-то специальные лаки, в итоге, чаще всего, портя собственные полы.
Лиственница после брашированияСейчас полы из лиственницы принято брашировать (подвергать искусственному старению путем натирания щетками с жесткой или даже проволочной щетиной) и затем пропитывать маслом. Надо сказать, для лиственницы это наименее травмирующий вариант обработки, и он вполне приемлем для любителей сделать из красивого «еще красивше».
Гораздо более актуален вопрос: чем покрыть фанеру на полу? Фанера часто используется в качестве чернового пола – настила поверх обрешетки.
Пол из фанеры после покрытия лаком и покраскиЧтобы защитить ее от растрескивания при перепаде температур и влажности, фанеру покрывают лаком на алкидно-уретановой основе. После этого следует черновой фанерный пол покрыть плиткой, паркетом, ламинатом. Если нет больших претензий, то просто покрасить эмалью и прикрыть ковриком или циновкой.
Чем покрыть бетонный пол?
Вопрос этот актуален для новоселов современных «свечек», которые часто сдают безо всякой внутренней отделки. Бетонный пол квартиры в таком случае – это плита межэтажного перекрытия.
Грунтовка бетонного полаГлавная проблема бетонного пола – он пылит. Цементная пыль может отравить жизнь семье и испортить людям здоровье. Чтобы избавиться от нее, бетон пропитывают, грунтуют, красят.
Прежде чем покрыть цементный пол, его пропитывают грунтовкой. Или полиуретановой, или эпоксидной. Полиуретановая хорошо противостоит химическим веществам, бензину, маслам; эпоксидная обладает повышенной водонепроницаемостью. Кроме того, эпоксидная грунтовка может быть использована как самостоятельный защитный материал, без последующего окрашивания.
Чем можно покрыть пол из бетона?
Эпоксидные краски (например, Johnstone’s) обладают всеми мыслимыми достоинствами, но нуждаются в предварительном приготовлении. Продаются раздельно: в одной банке — основа, в другой — активатор. Часто используется в тех помещениях, где бетонный пол является финишным. Например, в гаражах, подсобках, цехах и т.п.
Покраска бетонного пола эпоксидной краскойВ жилых помещениях чаще используется акриловая краска (например, Superweiss). Главное достоинство акриловой краски – простота нанесения. Подойдёт и валик, и кисть, и распылитель.
Полиуретановая эмаль также является двухкомпонентной смесью. Ни в чем не уступит эпоксидной краске и столь же подходяща для окраски полов в жилых помещениях, как акриловая. Главный недостаток – длительный срок сушки. Полностью готовым к эксплуатации пол, покрытый полиуретановой эмалью, будет лишь через две недели.
Разобравшись, чем покрыть бетонный пол, нам почти наверняка придётся перейти к вопросу, чем покрыть теплый пол? Потому что бетонная плита, даже окрашенная – не самый оптимальный вариант в качестве финишного пола.
Краска SuperweissПонятно, что облицовочный материал для теплого пола должен обладать хорошей теплопроводностью. Эксперты рекомендуют укладывать поверх водяного теплого пола кафельную плитку; поверх электрического — керамогранит или натуральный камень (мрамор). Благодаря большей теплоёмкости эти материалы будут обогревать помещение даже после того, как электрообогрев пола отключен: электричество ныне дорого!
Укладка плитки на теплый полМенее комфортные варианты предлагают покрывать тёплый пол (поверх стяжки, конечно же) тонким ламинатом или линолеумом. Толстый звуко- и теплозащитный линолеум в таких случаях не годится.
Ситцевые полы
Другой насущный вариант: пол покрыт линолеумом. Но материал этот уже приелся, хочется как-то его обновить, кардинально поменять весь интерьер помещения. Чем дешево покрыть пол, желательно, прямо поверх старого, изношенного, возможно и дырявого линолеума?
Заливка наливного полаИдеальным решением в этом случае стал бы наливной пол – он и спрячет под собой старый линолеум со всеми его потёртостями и даже трещинами, и идеально выровнит поверхность. Но эксперты протестуют. Линолеум в качестве основания – слишком мягкий, податливый материал, а у наливных полов низкая прочность на растяжение и излом. После непродолжительной эксплуатации в таком покрытии появятся трещины.
Но безвыходных положений не бывает. Если повысить толщину наливного пола до 4-5 см и заливать его на армирующую («кладочную») сетку, то стойкость наливного пола к растягивающим и изгибающим нагрузкам заметно возрастет. А если поверх наливного пола наложить еще и слой упрочняюще-декоративного покрытия, то можно не заморачиваться и трещинами и пр. каверзами.
Ламинат поверх наливного полаНо, в таком случае, чем покрыть наливной пол?
Обычный подход в таких случаях – укладка паркетной доски или ламината. Но есть и сверхмодное эксклюзивное решение: «натяжной» пол.
В принципе, эта технология известна с советских времен и ее часто использовали шабашники при отделке квартир номенклатурных бонз. Хитрости большой нет: ткань (ситец, сатин, бязь) натягивается поверх пола, приклеивается по краям (в небольших помещениях – крепится гвоздиками) и пропитывается в пять-шесть слоев лаком. Нюанс состоит в том, что поверхность под тканью должна быть идеально гладкой – иначе пропитанный лаком материал быстро растрескается.
Пол из натянутой ткани поверх наливногоНаливной пол как раз и позволяет решить эту задачу. Остальное – дело техники. Современные умельцы создают «ситцевые» полы даже с рисунками 3D. В то же время «натяжной» пол страхует наливной от его слабого сопротивления растягивающим нагрузкам: пропитанная 5-6 слоями лака ткань по прочности на растяжение не уступит пластинкам ламината.
И все же, на всякий случай, старый линолеум из-под столь ценного «бутерброда» лучше заблаговременно убрать…
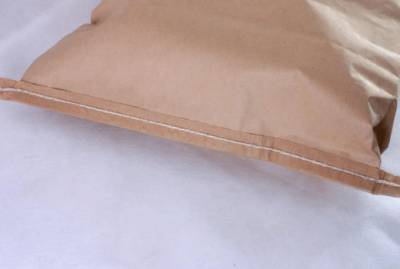
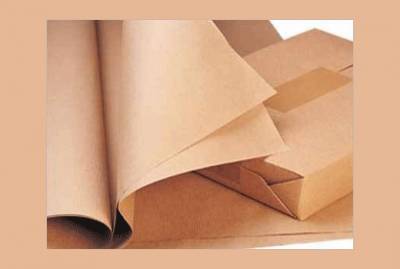
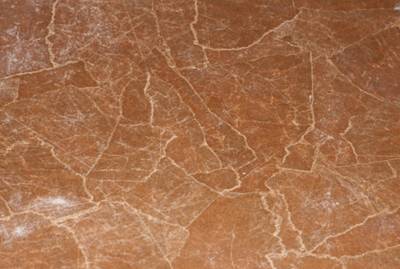
Это напольное покрытие очень декоративно, внешний вид его напоминает камни или старую кожу. Действительно оригинальный пол. А в качестве отделочного слоя пола используется обычная упаковочная бумага. Из нее делают мешки для строительных сыпучих материалов. В принципе, если найдете такие мешки, то можно их использовать, если мешков нет, просто купите бумагу в рулонах.
Что понадобится, чтобы провести обновление пола
- Бумага «строительная» или бумажные мешки;
- Клей ПВА строительный;
- Морилка для дерева;
- Лак для дерева или лак паркетный.
Как сделать декоративное напольное покрытие: поэтапно:
1. Сначала подготавливаем основу под напольное покрытие. Так как декоративный слой будет тонкий, основу необходимо выровнять как можно лучше. Если пол бетонный и неровности его значительные, придется залить тонкий слой новой стяжки. Когда пол высохнет, его нужно будет отшлифовать наждачкой, чтобы убрать мелкие дефекты. После этого хорошо выметаем цементную пыль влажной щеткой и наносим грунтовку по бетону.
2. Можно обновить деревянные полы, но щели сначала придется зашпаклевать. Очень хороший вариант: постелить на пол листы фанеры, а на них уже наносить декоративный слой.
3. Бумагу нужно не разрезать, а порвать руками, чтобы куски были неровные. Можно добиться не «каменного», а «кожаного» декоративного эффекта напольного покрытия, если каждый кусок бумаги смять и придавать небольшим грузом. Когда будете приклеивать куски бумаги, они расправятся, но линии сгибов останутся. Можно смять сразу все куски бумаги, положить на них какой-нибудь щит, а сверху груз. И оставить так на ночь.
4. Сделайте смесь из 50% клея и 50% воды. Затем, распрямите каждый листок бумаги, зачерпните немного клея рукой и промажьте с обеих сторон (удобно над миской).
5. Уложите кусок бумаги на пол, выровняйте его, прижимая, чтобы удалить пузырьки. Имейте в виду, что бумага будет немного сжиматься при высыхании, поэтому перекрытия делайте побольше. Но слишком толстый бумажный слой делать не нужно, достаточно 2-3 перекрытия.
6. Когда бумажные витражи на полу готовы, оставьте их на 2 дня – они должны хорошо высохнуть. Потом покройте их клеем (разведенным водой 50/50) еще раз и опять оставьте для высыхания.
7. Когда все высохнет, вы обнаружите, что куски бумаги отличаются по цвету. Оказывается две стороны «строительной» бумаги, которые на первый взгляд кажутся одинаковыми, имеют разный цвет. Здесь вам понадобится морилка. Подберите нужный цвет заранее. Сделать это можно так: скомкайте пару кусочков бумаги, потом распрямите, промажьте клеем, дайте высохнуть и окрасьте морилкой. Если цвет подошел, используйте его для всего пола.
8. Для окончательного высыхания должно пройти 3-4 дня.
9. Высохший пол покрываем лаком для дерева или паркетным. В принципе, бумага – это продукт из древесины, так что проблем никаких не возникнет. Ждем, когда лак высохнет, и еще раз лакируем пол. Можете выбрать глянцевый или матовый лак – по своим предпочтениям.
10. В результате у вас получается просто потрясающее напольное покрытие: оригинальное, дорогое на вид и дешевое на самом деле. И очень прочное.
Хочу больше статей:
Оставьте Ваш отзыв
Average rating: 0 reviewsTags:
ламинат линолеум плитка 90000 How to Cover a Wood Floor | Home Guides 90001 90002 Wood floors are not always what they’re cracked up to be. In cold temperatures, wood is sometimes chilly underfoot. In an older home, the wood might be damaged with scratches, scorch marks from a popping fireplace or general wear and tear. Whatever prompts you to cover a wood floor, there are many options besides carpeting. 90003 90004 Paint 90005 90002 Bare and finished wood floors can be covered with water- or oil-based primer and floor paint, but the floor should be lightly sanded first to help the primer bond.Unless the floor is very rough, a sanding technique called screening should be sufficient. Screening requires an upright floor buffing machine, which you can rent, and fine-grit sanding screen. If the floor is very rough or uneven, a more powerful drum-style sander might be necessary. Apply a coat of primer with a roller, then apply at least two coats of floor paint. Protect the paint with a top coat of clear urethane sealer. If solid-color paint seems boring, add stenciled or free-hand painted designs around the room before sealing.90003 90004 Tile or Stone 90005 90002 If the wood floor is sturdy, you can cover it with tile, stone or even brick veneer. A layer of tile backer board helps minimize the natural movement of wood floors. Backer board installs with screws, similar to drywall. If the room is prone to damp conditions, such as in a bathroom, the backer board manufacturer may recommend a water barrier membrane under the backer board sheets. Whether you are installing tile, stone or brick, you’ll need thin-set adhesive and grout.Spread cementitious thin-set mortar over the backer board, set the tiles, stones or brick veneer, and fill the joints with grout. Sealing the grout helps to prevent stains from dirt and spills. If tile seems too cold, install radiant heating over the backer board before installing the tile. 90003 90004 Laminate 90005 90002 Laminate floors are installed in a floating system, which means most of the floor is not nailed or glued down. Laminates are much faster to install than a traditional wood floor.A cushioned underlayment sheet is spread out over the wood floor, and the laminate is installed on top of the underlayment. The first row of laminate is nailed to the floor, which prevents the floor from shifting. Each additional row snaps together with the previous row, tongue-and-groove style. The final row is nailed to the floor like the first. Some laminate manufacturers recommend gluing the edges of the rows together, which helps prevent separation. Some laminates are compatible with radiant heat systems.90003 90004 Vinyl or Linoleum 90005 90002 The flexibility of vinyl and linoleum has its benefits and drawbacks. Both materials are relatively soft underfoot, but repeated foot traffic can mold the flooring around every seam and imperfection throughout the wood floor underneath. A layer of plywood fastened on top of the wood floor produces a flat, smooth surface with fewer seams to show through. Vinyl and linoleum are available in sheets and tiles, and both require special adhesive. You can either glue the the whole sheet of vinyl to the floor, or only glue the perimeter.Vinyl tiles are usually peel-and-stick, with adhesive already on the tiles. Linoleum is most often a fully glued installation, whether sheets or tiles. A heavy flooring roller presses newly installed vinyl or linoleum against the adhesive, helping to increase the bond. 90003.90000 DIY Cheap Plywood Flooring Ideas for $ 100 in 7 Easy Steps 90001 90002 It was a steamy summer day when we first set foot onto our homestead. 90003 90002 At the time, it was a piece of overgrown land with a double-wide trailer on it that was deemed uninhabitable. We got a killer deal on it and just like that we put our money down and purchased our future homestead. 90003 90002 However, the house had no floors, only sub-floors. It wreaked of dog urine and it was extremely outdated and had been foreclosed on twice.90003 90002 Basically, it needed a lot of work. However, we did not want to spend more than a thousand bucks. So today I’m going to share with you how we created awesome floors in our kitchen for a little over $ 100. 90003 90002 Here we go … 90003 90012 What You’ll Need 90013 90014 90015 Plywood 90016 90015 Nail Gun 90016 90015 Nails 90016 90015 Sander 90016 90015 Table Saw 90016 90015 Stain 90016 90027 90028 1. Get the Idea 90029 90002 You might be wondering why we decided to create our own floors.Well, truthfully, we were on a budget (as always), and we 90031 needed 90032 a new kitchen. 90003 90002 So we went to our local home improvement store and thought we would just purchase some quality laminate flooring. We did lay cheap laminate floors when we first moved in, but they cracked very easily. 90003 90002 When we measured our kitchen and compared it to the cost of laminate flooring, we soon realized we would be spending almost $ 600 just on the flooring. That did not include the padding that went underneath.90003 90002 So this was a huge issue as we only had a $ 1,000 budget! Well, we went to Pinterest and started looking for DIY floors and that is where the idea of rustic farm floors came about. There were some videos and articles on how to do these a little differently than we did but I feel like our method worked great. Not only that but it was also efficient, and cost-effective. 90003 90028 2. Measure and Buy 90029 90002 Next, you’ll need to measure the space where you want to apply the wood floors to.For us, the measurements were 15 x 8 feet. So once we had our measurements in hand, we went to our local home improvement store and purchased already sanded plywood. 90003 90002 However, you could purchase the cheaper option which is the rough cut plywood. It is about half the price but does require a lot more sanding. My elderly mother-in-law lived with us at the time so we had to be quick and get our house back together. 90003 90002 The already sanded plywood suited us better. However, this is completely up to you and your budget.90003 90002 You also need to purchase a nail gun as it makes your life a lot easier. However, before getting one (especially if you’ve never used one before) make sure you are knowledgeable about the safety precautions. 90003 90002 Also, purchase the appropriate nails needed for the project. One pack should do the trick as it does not take many nails to nail the boards down securely. 90003 90002 You’ll also need a sander and a good table saw if you do not have them already. We were lucky enough that we already had all of the necessary tools on hand.90003 90028 3. Cut Your Plywood 90029 90002 Here’s a nice video on how to break down plywood: 90003 90002 90059 90060 90003 90002 I have heard that certain home improvement stores will actually cut your plywood to the correct size for you. 90003 90002 However, our local store did not do it for us. So we had to go home and cut it ourselves. If your local store is just like ours then you’ll have to cut the boards yourself. Set up your table saw and cut your boards to 6-inches by 48-inches long.The trick to this step is to try and cut your boards as straight as possible. 90003 90002 It will make laying them much easier. However, if by some chance you do not get them perfectly straight do not panic, you can still get them to work. 90003 90002 My husband and I made this project a two-person operation. He would feed the boards into the table saw, and I would help guide them off of the table saw and stack them. 90003 90002 And that is all there is to it. You will have your floor at this point.90003 90028 4. Lay Your Floor 90029 90002 You will lay this floor just like you would any other laminate style flooring. You will start laying one row of boards and run all the way to the end of the space. And then start on the next row. 90003 90002 However, this is where our method differs from a lot of the other farmhouse floors. Some people place a coin in between each board. This gives it a little bit of a more rustic look. 90003 90002 Even so, we did not do this for two reasons. First, this would have added one more step in our DIY process and we just did not like it enough to take that extra step.90003 90002 Second, unwanted gunk can easily be caught in those cracks. I personally did not want the challenge of having to clean the gunk out of those cracks. However, you know gunk is probably inevitable in the kitchen. 90003 90002 So if you are placing these floors in a room where they might be less likely to catch all of the unwanted dirt and gunk in them then you might want to consider placing the spaces between boards. 90003 90002 For us it was not the right choice. So it’s up to you. 90003 90028 5.Sand the Floors 90029 90002 The next step is rather self-explanatory. You will take your sander (even if you purchased the sanded plywood) and go over it. Unfortunately, you will feel this step on your back. I’m actually the one who did this part of the project because I’m shorter. I also did it bare-footed. 90003 90002 So that way when I was finished sanding an area I could rub my feet over it and see if it was smooth enough to walk on without socks or shoes. 90003 90002 If not, then I’d go over it some more.You’ll just keep repeating this process over the whole floor until it is sanded to your preference. 90003 90028 6. Clean Them Up 90029 90002 Now, you’ll want to clean up the floors. Be sure to go over them with a good broom, vacuum cleaner, or shop vac because you’ll want to get as much of the debris up as possible so when you apply the stain to the floor nothing will show. 90003 90002 We did this by using our shop vac. I did not include it in the tools needed list because this can be accomplished with a broom or with a good vacuum cleaner.90003 90002 Be sure to walk on the floors with bare feet again so you’ll be able to feel how clean they actually are. 90003 90028 7. Stain Them 90029 90002 This next step is very simple and gives the floors a finished look. Once your floors are sanded and cleaned it will be time to add some stain. 90003 90002 You can add a simple coat of polyurethane which will leave the floors the lighter color of the plywood but will still give the floors needed protection from liquids falling on them. Or, you could also add a darker stain if you desire a deeper look.90003 90002 We actually chose to whitewash our floors. Let me tell you why: it gives our kitchen a rustic, country charm that I really desired when we remodeled it. 90003 90002 Yet the best part of having whitewashed kitchen floors is that they are actually great at disguising the dirt. When I sweep my floors, I’m amazed at how clean they look yet I get up a lot of dirt. 90003 90002 Now is probably a good time to request that you do not judge me for having dirty floors. I have children and a husband that do not believe in wiping their feet before entering the house.90003 90002 Fortunately, the floors shine when you mop them because your floors (that never looked dirty, to begin with) are bright and white like new again. So needless to say I absolutely love and do not regret my choice of whitewashing. 90003 90002 You still need to know how to apply the stain, though. We actually added a broom handle to a roller brush. Then we painted our floors like you would your kitchen walls. Just try to apply it as evenly as possible. 90003 90002 Also, be sure to give your floors time to dry.Then add another coat of paint to the floors. Once you are pleased with the color then you can quit covering them. 90003 90002 Now you are ready to enjoy your floors. 90003 90012 How to Clean and Repair Your Floors 90013 90002 The best part about these floors is that they do not require anything special to clean them. You will need a heavy old fashioned mop and some hot, soapy water. Then you’ll just wring your mop out from the soapy water and go over the floors. 90003 90002 If you have some dirty spots that are stubborn to remove, add a little pressure and they should disappear rather easily.90003 90002 If by some chance something happens to your floors, you do not have to take up the whole floor. You will simply cut another board to size and pull up the bad board or boards and replace them like you did when you put the floors down. 90003 90002 It does not get any easier to clean or repair any floor than that. 90003 90002 Well, there you have it! We actually put these floors down in our kitchen for a little over $ 100. 90003 90002 So hopefully this will give you an idea of how to remodel your homestead house on a budget.90003 90136 90137 90028 Was this article helpful? 90029 Yes No × 90028 We appreciate your helpul feedback! 90029 90002 Your answer will be used to improve our content. The more feedback you give us, the better our pages can be. 90003 90136 Follow us on social media: 90137 Facebook Pinterest.90000 How to Soundproof Floors in Apartment: Do-It-Yourself in 3 Easy Steps! 90001 90002 I want to soundproof my apartment floors 90003 90002 It is pretty much common knowledge among those living on their own that an apartment is by far one of the nosiest places to inhabit. 90003 90002 There is noise coming from all directions from pets, fighting couples, loud stereos, babies … you name it. 90003 90002 Conversely, there is always a chance that the activities that you partake in yourself can cause issue with your neighbors as well.90003 90002 No matter if you cause noise by having company or playing music, whatever sound you create in your apartment can likely be heard by your neighbors. 90003 90002 This is why you will want to look into potentially soundproofing your apartment, and one of the best methods to do so is to soundproof your apartment floor. 90003 90002 This helps absorb vibrations that are created by one’s daily noise and makes it possible to block out the noise of others. 90003 90002 In this article we will be taking a look at the ways in which you can make your own apartment into a haven that is safe from noise, both inside and out.90003 90002 We will be looking at the methods that can be used and the products you need to create a soundproof apartment floor, and without losing your security deposit on unauthorized modifications. 90003 90020 90020 90002 90023 How to Soundproof Floors in Your Apartment 90024 90003 90002 What You’ll Be Needing: 90003 90002 Prosource Puzzle Exercise Mat 90003 90002 Use this as the first layer that you will lay on the floor 90003 90002 LAMINATE Flooring Underlayment 90003 90002 Helps provide an extra sound-deadening barrier 90003 90002 Premium Grip Rug Pad 90003 90002 Provide ample protection from noise 90003 90002 Green Glue Compound 90003 90002 Has a noise-canceling power and keeps any carpeting layers in place 90003 90044 But First, a Notice 90045 90002 Even before you get started looking for ways on soundproofing floors, you will want to make sure that you are able to make the adjustments without infringing on anything that may be within your lease.90003 90002 I know this sounds like it’s obvious, and in most cases an apartment tenant will be fine, but in my own experience I’ve lived in an apartment complex that had strict, if not entirely stupid, rules. 90003 90002 This included modifications or «hazards» that may interfere with safety or devalue the look of the apartment. 90003 90002 So, if you live in one of these super-strict areas, you may well want to look into if you will be able to make any sound canceling applications to your apartment at all.90003 90054 Method 1: Paying a Professional 90055 90002 If you have some extra money in your budget laying around, then paying a professional to soundproof your apartment floor is likely the way to go. 90003 90002 Doing this, you do not have to worry about buying materials or doing any sort of «DIY» renovations. 90003 90002 Instead, you just have to worry about having the money to pay the professional and sitting back and letting the magic happen. 90003 90002 With that in mind, professional installation can be way more expensive than buying the needed materials and doing the work yourself.90003 90002 Also, a lot of the professional work can be considered permanent alterations; something that is frowned upon if you are renting an apartment and do not wish to violate your lease. 90003 90002 However, should you have the money to spare and either own your apartment or your landlord approves the changes, then this is the easiest way for one to soundproof their apartment floors. 90003 90068 90068 90054 Method 2: The Many DIY Floor Soundproofing Techniques 90055 90002 So you say you are willing to get dirty and you have the money to spare on soundproofing materials as well? 90003 90002 Then welcome to the world of Do-It-Yourself floor soundproofing! 90003 90002 There are several ways in which one can soundproof their own floor, some of which are more time consuming and permanent than others.90003 90002 As you may have guessed, because of the nature of some of these projects, you’ll want to make sure that you are able to actually make these modifications and that you will not be in violations of your apartment lease. 90003 90002 After all: no amount of noise-cancellation is worth being homeless. 90003 90002 For the majority of these methods it is easier to have a non-carpeted, bare floor to work with. 90003 90002 This will make it easier to apply the various pads and carpets to the floor and often requires the least amount of work.90003 90002 Even so, not everyone who lives in an apartment will have this convenience available to them, which is why some of these methods can also be used on an already carpeted floor, albeit with a little more work involved. 90003 90088 90088 90002 90091 how to soundproof a floor (DIY Techniques) 90024 90003 90002 90054 DIY Technique 1: Interlocking Floor Mats 90055 90003 90002 Do you ever remember having those strange, puzzle-piece looking mats on the floors of your elementary school classroom or kids ‘nursery? 90003 90002 These mats are actually used for soundproof purposes, and can be used inside of your own apartment as well.90003 90102 90102 90002 To use these interlocking floor mats, you simply have to lay the first one down into the corner of your apartment floor and work from there, covering your floor by connecting the mats as if one large jigsaw puzzle. 90003 90002 Repeat until you cover the surface in which you hope to soundproof. 90003 90002 This technique is one of the easiest soundproofing methods for those that do not want to spend too much time and effort. 90003 90002 It is also one of the cheapest, with some products such as the Prosource Puzzle Exercise Mat being as low as around $ 20.90003 90002 The downside is that interlocking floor mats are not always the best at dampening noise when compared to some other products you can use. 90003 90002 For the best effect, try combining the floor mats with other soundproof materials, such as … 90003 90054 DIY Technique 2: Acoustic Floor Underlayment 90055 90002 An Acoustic Floor Underlayment is kind of like a very thin layer of insulation that is usually placed underneath the carpet (or something like the aforementioned interlocking floor mats) to help provide an extra sound-deadening barrier.90003 90002 For this reason, when applying an underlayment, you’ll likely want to do so on top of a bare hardwood or vinyl floor, if possible. 90003 90002 For soundproofing purposes, one of the best underlayments that you can use is the LAMINATE Flooring Underlayment. 90003 90002 This underlayment is made with a vapor barrier and is 3mm thick, giving it the best potential for absorbing sound. 90003 90002 To apply, unroll the material on your floor, covering from wall to wall as if covering something with aluminium foil.90003 90002 Secure the material to the edge of your floor using nails, if necessary. 90003 90002 Repeat as needed until you have the area covered, cutting the material off at the edge of the floor. 90003 90054 DIY Technique 3: Carpet Padding 90055 90002 The best way to think of carpet padding is like a bicycle helmet for your floor, which is specifically designed to be thick enough to provide ample protection from the danger that is «noise». 90003 90136 90136 90002 These carpets, while very efficient in their own right, get their most potential when layered underneath traditional carpet.90003 90002 The application process for the placement of carpet padding is not unlike that of placing traditional carpet in your home: 90003 90002 You simply roll out the material until it meets both ends of your floor, cutting it at the edges and securing it with glue or nails (depending on preference). 90003 90002 You’ll need a few tools to get the job done this time, plus, due to a heavier weight, you may need a friend or two to help with the installation process. 90003 90002 There are many different carpet padding that are available simply for the purpose of soundproofing, but our pick has to be the Premium Grip Rug Pad.90003 90002 This is because these pads are ultra-durable and slip resistant, making the application process easier. 90003 90150 90151 90002 90054 Additional Items for Soundproofing Your Apartment Floor 90055 90003 90044 90157 Glue and Other Soundproofing Compounds 90158 90045 90002 While all the DIY Techniques above can be good in their own right, everything can always be better. 90003 90002 If you want to get even more noise canceling capability from your soundproof textures, you may want to try using a soundproofing compound.90003 90002 These compounds are usually adhesives, such as glue, which help to secure items such as acoustic underlayment and soundproof carpet padding to a hard floor while also providing its own noise-canceling capability. 90003 90002 It does this by adding an extra layer of sorts between two hard layers, which prevents any noise from escaping either into, or out of, your apartment. 90003 90002 One other benefit of using compounds over something like nails is that nails actually can cause more noise, even if it is slight.90003 90002 This is because the metal nails can echo vibrations, creating a bit more noise when you walk over them as opposed to compounds. 90003 90002 One of the best adhesives that you can buy, the Green Glue Compound, does not come cheap at around $ 95 dollars for five tubes, but it is without doubt worth every penny. 90003 90174 90174 90002 This is because the Green Glue Compound is industrial strength, meaning that it will keep any carpeting layers in place, and has been put through multiple frequency test to assure its noise-canceling power.90003 90002 Doubtful? Read more about Green Glue over here. 90003 90044 90157 Your Choice of Flooring: 90158 90045 90002 Living in an apartment, especially one that you rent, you may not have much of a choice in the kind of flooring you have. 90003 90002 In other words, you are basically stuck to work with whatever flooring is already there, if you are allowed to do any work inside your apartment at all. 90003 90002 Should you have the choice to add your own choice of flooring to your apartment, however, then this choice can play a large part in the amount of sound that can be heard within your abode.90003 90190 90190 90002 For the base layer, you obviously would want something along the lines of hardwood or tile to work with. 90003 90002 This will give you the easiest layer to work with when adding a soundproof layer or carpet. 90003 90002 For the top layer (applied after your choice of soundproofing materials, in most cases.) You will want a thick, firm carpet that is not too spongy. 90003 90002 This layer of carpeting is essential as you want something that will be thick enough to absorb sound, but not so soft that it becomes difficult for you to walk on.90003 90002 As far as the design and style, that is your choice as this plays little part in the effectiveness of your carpet’s sound adsorption. 90003 90002 You might also like: What You Need to know about Acoustic Flooring 90003 90023 On Soundproofing the Apartment Floor 90024 90002 Remember when you are laying down your soundproof flooring that you do not need to limit yourself to just the use of one material. 90003 90002 Carpet padding, acoustic underlayment, and interlocking pads all work best when combined with each other to create the best possible soundproofing.90003 90002 If you need help with layering, it should be done like this (from the bottom layer, up): 90003 90212 90213 90002 1 90003 Floor base (tile, cushioned tile, hardwood) 90216 90213 90002 2 90003 Mats 90216 90213 90002 3 90003 Carpet pad or acoustic underlayment 90216 90213 90002 4 90003 Carpet 90216 90229 90230 90230 90002 To reduce the amount of sound travel in your apartment, try to make sure that there are no gaps between your soundproof flooring and the wall. 90003 90002 If you want to be on the safe side, you can even have your carpet pad or underlayment come up your wall a bit so that it will be level with the top layer of carpeting, sealing the mat to the wall with a compound.90003 90002 Finally, even though some of these methods can be easy enough to do by yourself, it is probably in your best interest to have a friend help you out with this DIY project. 90003 90002 It will make the process much easier and eliminate some of the frustration of working alone. 90003 90002 Soundproofing your apartment floor is no small undertaking, but it is one that is well worth the time and effort. 90003 90002 Before you know it, you will be living in an apartment that is almost completely free from the noise of your neighbors and is as peaceful as you want it! 90003 90002 90157 Active Time 90158 20 minutes 90003 90002 90157 Total Time 90158 20 minutes 90003 90054 Materials 90055 90212 90213 Prosource Puzzle Exercise Mat 90216 90213 LAMINATE Flooring Underlayment 90216 90213 Premium Grip Rug Pad 90216 90213 Green Glue Compound 90216 90229 90054 Instructions 90055 90266 90213 DIY Technique 1: Interlocking Floor Mats 90216 90213 DIY Technique 2: Acoustic Floor Underlayment 90216 90213 DIY Technique 3: Carpet Padding 90216 90213 DIY Technique 4: Glue and Other Soundproofing Compounds 90216 90213 Alternative: Paying a Professional 90216 90277 .