Содержание:
- Кирпичная печь.
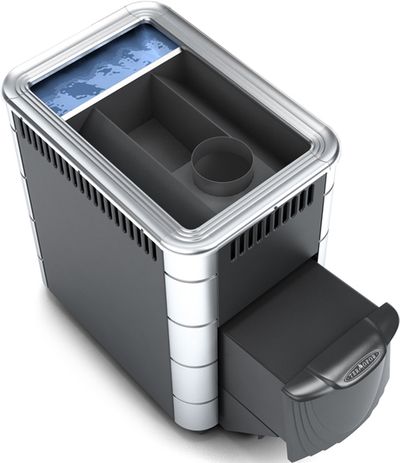
- Горячая печь.
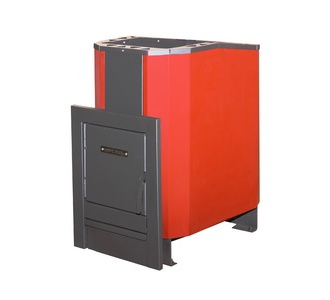
- Печь непрерывного нагрева.
- Электро — печь каминка.
Когда баня из дерева построена, все отделочные работы проведены и уже невтерпеж попариться в ней, пришло самое время приобрести печь. Но не стоит покупать первую попавшуюся.
Прежде, чем приобрести, необходимо ответить себе на ряд вопросов:
- Какой тип печи вы предпочитаете: с влажным паром или сухим;
- Какая площадь внутренних комнат бань;
- Ознакомиться с ценами на печи Топи-Мойся;
- Большой ли компанией вы планируете отдыхать в бане;
- Как быстро печь должна растапливаться и прогревать баню;
- Какую площадь вы готовы отвести под печь.
Если с основными задачами печи и ее функциями разобрались, можно переходить непосредственно к выбору одного из наиболее подходящих вариантов.
Как выбрать печь для бани – пожалуй, самый серьезный среди предметов интерьера и обихода данного помещения. Ведь можно обустроить уютную парную, в которой будет приятно находиться, обставить шикарную комнату для отдыха после парилки, и прогадать с печью для бани. А именно она отвечает за жар в парной комнате.

На сегодняшний день имеется огромный выбор отопительных элементов для парных, которые предлагают компании Кирова — Радуга, Термофорт, Жарсталь и другие . Их разделяют их по разным параметрам. Самым главным считается разделение печей на «горячие» и «холодные». Суть в том, что «горячие» печи прогревают помещение посредством нагревания элементов самой печи, причем нагреться стенки смогут прогреваться до 1000С. Принцип же работы «холодной» печи состоит в том, что ее стенки прогреваются до температуры от 40 до 500С, а помещение парной она прогревает посредством забора холодного воздуха, обогрева его и подачи через каналы горячего, нагретого до необходимой температуры воздуха.
Здесь есть одно значительное преимущество горячих печей «Топи Мойся» – ее размещают в любом помещении, а холодные печи невозможно устанавливать в помещении без постоянного отопления, потому что она не в состоянии самостоятельно прогреть помещение.
Следующим видом классификации печей для бани, является тип строительного материала, из которого они произведены. Подвида два – кирпичные и металлические.
Рассмотрим плюсы и минусы каждой печи:
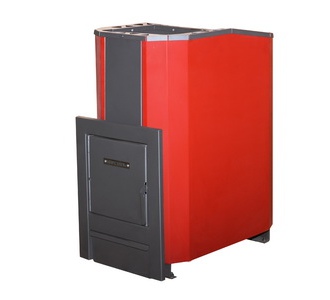
Кирпичная печь
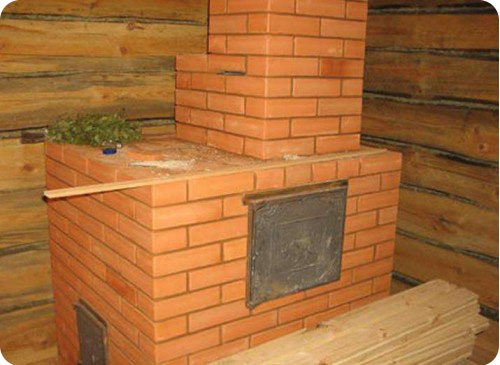
Кирпичная печь нагревается очень медленно. Для того чтобы попариться, предварительно необходимо, как минимум 2 часа прогревать печь, добиваясь необходимой температуры для парения. Да и выстроить ее самостоятельно практически нереально, для этого необходимы специальные знания и навыки для укладки кирпича и монтажа дымохода. То есть для устройства такой
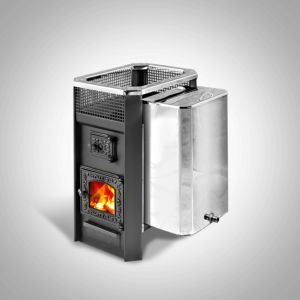
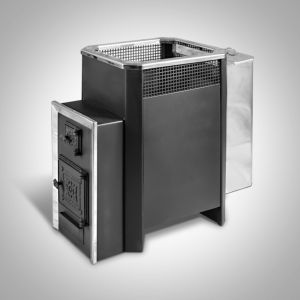
Горячая печь
Проще обстоит дело с чугунной, или печью из жаростойкой стали от компании Термофорт. Она монтируется относительно легко, стоит недорого. А главное ее положительное качество в том, что она достаточно быстро нагревается. Включив такую печь для бани, вы через полчаса можете начать процесс парения, что является огромным плюсом. Однако и остывает она практически сразу после отключения.
Обзор чугунной горячей печи!
Еще один вид классификации печей «Топи Мойся» – на печи непрерывного нагрева (так называемые, постоянные) и печи прямого нагрева от компании Жарсталь.
Установка печи при строительстве бани!
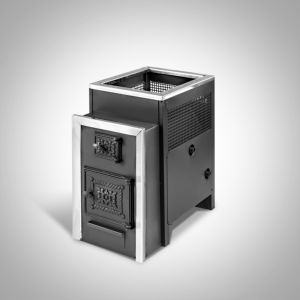
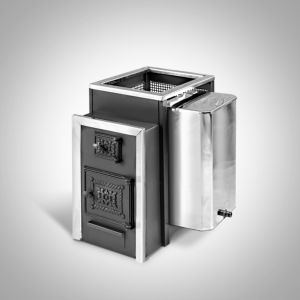
Печь непрерывного нагрева

Они способны очень долго сохранять тепло за счет вмонтированных чугунных болванок (весом до 7 тонн). Один из ярких примеров бань прямого нагрева – это общественные. Прогрев бани происходит ночью, ведь во время него париться запрещено (небольшое количество воды, вылитое в духовку, способно мгновенно заполнить все помещение бани угарным газом). Зато жар будет держаться в течение как минимум 12 часов.
Непрерывные печи не прогреваются до такой высокой температуры, но среди их положительных характеристик выделяют то, что в них можно париться в момент прогрева, так как изготовленном из нержавейки духовом шкафу находятся камни.
Вместо печей постоянного и прямого нагрева можно использовать альтернативный вариант – электрическую печь-каменку.
Электро — печь каминка
Ее отличительной чертой является то, что изготовлена она из легированной стали, что дает устойчивость к высоким температурам.
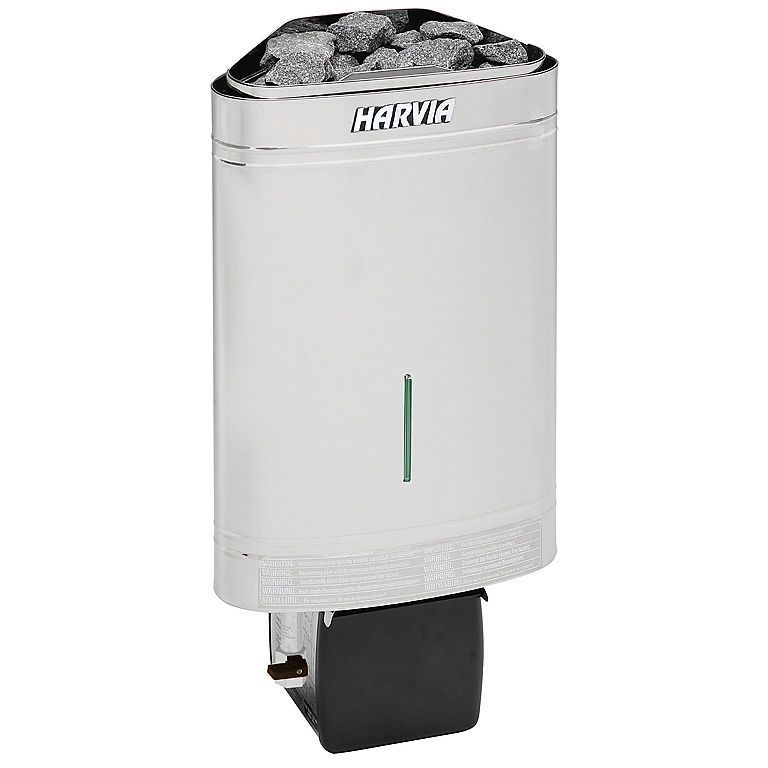
Главными положительными качествами такой печи являются следующие характеристики: быстрый нагрев, не сложная установка, возможность монтажа печи как на полу, так и на стене, а также возможность программирования. Однако самым главным ее положительным свойством является наибольшая безопасность, ведь при возникновении неисправностей или неполадок, автоматика устройства перекроет подачу энергии.
Некоторые виды таких печей порадуют хозяина наличием духовки, наполненной камнями, которые при контакте с водой образуют пар. Остальные же могут похвастаться парогенератором, автоматически выпускающим порцию пара.
Такие печи оснащены системой управления, позволяющий устанавливать необходимую температуру, производительность и время работы, а также скорость и способ парообразования.
Для размещения электрической печи «Топи Мойся» необходимо заранее продумать вентиляцию. Вентиляционное отверстие находится внизу у печки и тепло передается посредством конвекции. А выходную вентиляцию необходимо разместить на противоположной от печи стене.
Важным параметром для парообразования является вес (объем) камней. Выбирать наибольший объем печи советуют любителям густого пара. Ведь чем больше камней, тем более непрерывно можно лить воду на камни. Однако прогреваться такая печь будет явно дольше.
Идеальным камнем является камень размером 4 на 8 см. Легко вмещаемый, он быстро нагревается и дает оптимальное количество пара.
СОВЕТ! Выбирать печь для бани надо очень тщательно. Только опираясь на все параметры парной, и зная все разновидности печей, можно выбрать по-настоящему хорошую печь, способную дать вам огромное количество положительных эмоций от процесса парения.
Будет интересно:
Печи для бани с баком для воды топи и мойся
ЗАСЛОНКА НА ДЫМОВОЙ ТРУБЕ ПОСЛЕ БАННОЙ ПЕЧИ
Заслонка на трубе, это развод на дополнительные «бабки». Тяга регулируется ТОЛЬКО поддувалом и никак иначе! Регулировкой на трубе вы можете только задушить кого ни будь из парящихся и увеличить образование сажи в трубе. Заслона (шибер, задвижка) на трубе нужна была тогда, когда огонь шёл непосредственно через камни, так называемая баня по черному с не изолированной каменкой. Тогда чтобы плеснуть в каменку, вам надо было закрыть заслонку, иначе пар весь уйдёт в трубу. Сейчас печи по типу «топи-мойся». Пар в любом случае в трубу не уйдёт. Большинство заслонок, используемых в банных печах, негерметичны и через них идёт подсос воздуха из бани в трубу. В бане максимум 100-120 градусов, а в трубе дым с температурой 500-600 градусов. Т.е. идёт подсос холодного воздуха. Значит, в месте этого подсоса, дым охлаждается, переходя из газообразного состояния в твёрдое, и образуется сажа. Задвижка на дымоходе предназначена только для сохранения тепла в печи. Её ни в коем случае не следует использовать для регулировки тяги!!! Поэтому, задвижка нужна в том случае, если необходимо подольше сохранить тепло: горячую воду для стирки или кормления животных, чтобы помыться утром тёплой водой. В частном доме, без газа, это все же может быть актуально. Но возникает и проблема сохранности самой бани. Если после мытья задвижка закрыта, это означает, что и вся влага в тёплой бане осталась, а в такой обстановке интенсивно будет происходить гниение деревянных элементов: пола, нижних венцов сруба, скамеек и т.п. Очень опасно также слишком раннее закрывание задвижки. когда дрова не прогорели до конца. Это может вызвать угар. При отсутствии задвижки после окончании мытья происходит естественная вентиляция бани за счёт тяги, вызываемой большой массой разогретых материалов: горячей воды в баке, камней в каменке, самой печи. Эта вентиляция удаляет влажный воздух из бани, проветривает её. Так что наш ответ неоднозначный! 99% печей Мы делаем без задвижки на печной трубе.
Топи и мойся — это печи быстрого прогрева в которых невозможно пострадать от угарного газа! Более того, бани с такими печами затопить довольно быстро, легко и уже через час (летом) или два часа (зимой) можно посещать баню со всеми её процедурами.
- Фирменные печи «топи — мойся»- оправдали своё качество службы.
- Печи указаны с ценами «под ключ», полный комплект и установка.
Печи компании «Жар-сталь»
|
Название печи |
Cруб бани (брус, бревно) |
Цена на печь |
Цена за работу |
Итого |
|---|---|---|---|---|
| 1. Фея — до 14 кубов.
|
2х3 | в комплекте 17700 | 11000 | 28700 |
| 2. Фея — до 14 кубов.
|
2.5х3 |
в комплекте 17700 | 11000 | 28700 |
| 3. Фея — до 14 кубов.
|
3х3 |
в комплекте 17700 | 11000 | 28700 |
| 4. Синара — до 18 кубов.
|
3х4 | в комплекте 20200 | 12000 | 32200 |
| 5. Синара — до 18 кубов.
|
3х5 | в комплекте 22800 | 13000 | 35800 |
| 6. Синара — до 18 кубов.
|
3х6 | в комплекте 24500 | 15000 | 39500 |
| 6. Синара — до 18 кубов.
|
4х5 | в комплекте 24500 | 15000 | 39500 |
| 8. Синара скала — до 20 кубов.
|
4х6 | в комплекте 25800 | 15000 | 40800 |
| 9. Куба — до 24 кубов.
|
5х6 | в комплекте 27800 | 15000 | 42800 |
| 10. Куба — до 24 кубов.
|
6х6 | в комплекте 27800 | 15000 | 42800 |


Кировские печи «Топи-мойся»
Все печи из стали 6 мм.
|
Название печи |
Сруб бани (брус, бревно) |
Цена на печь |
Цена за работу |
Итого |
|---|---|---|---|---|
| 1. Радуга — ПБ-11 до 20 кубов.
|
2х3 и более | в комплекте 18700 | 11000 | 29700 |
| 2. Радуга — ПБ-11Б до 20 кубов.
|
2.5х3 и более | в комплекте 19700 | 11000 | 30700 |
| 3. Радуга — ПБ-21 до 25 кубов.
|
3х3 и более | в комплекте 22700 | 11000 | 33700 |
| 4. Радуга — ПБ-21Б до 25 кубов.
|
3х4 и более | в комплекте 21200 | 12000 | 33200 |
| 5. Радуга — ПБ-22 до 25 кубов.
|
3х5 и более | в комплекте 24800 | 13000 | 37800 |
| 6. Радуга — ПБ-22Б до 25 кубов.
|
3х6 и более | в комплекте 23500 | 15000 | 38500 |
| 7. Радуга — ПБ-31 до 30 кубов.
|
4х5 и более | в комплекте 27500 | 15000 | 42500 |
| 8. Радуга — ПБ-31Б до 30 кубов.
|
4х6 и более | в комплекте 26800 | 15000 | 41800 |
| 9. Радуга — ПБ-33 до 30 кубов.
|
5х6 и более | в комплекте 25800 | 15000 | 40800 |
| 10. Радуга — ПБ-34 до 35 кубов.
|
6х6 и более Закрытая каменка! |
в комплекте 30800 | 15000 | 45800 |


В комплектацию печи входят:
- Сама печь — «топи мойся» — 1 шт.
- Бак из нержавейка 50-65 литров — 1 шт.
- Стартартовый элемент — 1 шт.
- Сендвич труба Нерж/оцинковка 115 — 2 шт.
- Потолочно проходной узел — 1 шт.
- Защита от протекания на крыше (мастерфлэш) — 1 шт.
- Зонтик трубы — 1 шт.
- Гофрированная труба (метал) для подводки горячей воды — 1-1,5 метра.
- Простой водяной кран с носиком — 1 шт.
- Асбестовая плита.
- Керамзит для защиты на чердаке.
СОВЕТ! Для истиных ценителей русской бани, имеется вариант печи с закрытой каменкой, для более лёгкого пара.
Каталог проектов — бани из бревна
Каталог проектов — бани из бруса 150х150
Содержание:
Банный домик с печью на своем загородном участке – мечта каждого русского человека. Те времена, когда глава семьи сам сооружал баню и клал печь, давно прошли. Сегодня для возведения бани есть грамотные специалисты, которые помогут каждому стать владельцем уютного домика с комфортной парной и теплой печью. Ведь именно печь является сердцем бани, без которого смысла в этом бревенчатом домике нет.
Банная печь – сердце парной
Печь для бани важна не только сама по себе – как источник тепла и пара, но и как средство сохранения банного домика в целости. От того, насколько качественно и надежно будет работать печь, как быстро она будет прогревать домик, зависит и удовольствие от посещения парной, и состояние стен самой бани.
СОВЕТ! Выбор и установка печи в банном домике производится до начала строительных работ. Подобная схема является предпочтительной, поэтому именно ее используют специалисты компании «Мастер Дачи».
Еще недавно во всех личных банях стояли громоздкие и неуклюжие кирпичные печи, которые и протапливались долго, и много места занимали в небольших парных. Сегодня все больше специалистов в процессе выбора печи для бани склоняются к печкам с общим названием «Топи-Мойся», которые не только отлично работают и гарантируют наличие тепла и пара, но и занимают очень мало места. К тому же выглядят они достаточно привлекательно, так что внешний вид парной не пострадает от установки такой печки.
ФАКТ! Банная печь «Топи-Мойся» является абсолютно безопасной, так что никаких проблем или травм в процессе ее эксплуатации не будет.
Совет мастера для установки печи топи — мойся
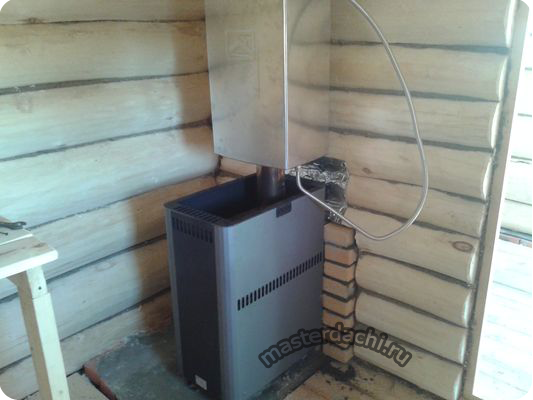
Тонкости установки печи «Топи-Мойся»
Первый этап установки печи для бани – это выбор ее разновидности. Компания «Мастер Дачи» предлагает качественные и надежные печи от отечественного производителя (ТЕРМОСОФТ и ЖАРСТАЛЬ), выполненные по технологии «Топи-Мойся». В зависимости от размеров банного домика выбирается один из видов печи:
- Печь с выносом – для просторной бани. Особенность такой конструкции состоит в том, что сама печь в процессе установки располагается в парной, тогда как топка врезается в стену между парной и моечной или предбанником.
- Печь без выноса – для небольшой бани. Такая модель располагается полностью в парной, так что для ее растопки не приходится покидать парилку.
Фундамент для выбранной печки подготавливается еще на этапе строительства бани. Размер подготовленной под печь площадки должен превышать размеры печи на 25-30 см с каждой стороны, чтобы избежать попадания искр на деревянные полы бани. Фундамент укрепляется слоем кирпича, который также должен приподнять тело печи над полом.
Затем стена, с которой будет соприкасаться печь, обкладывается кирпичом с целью защитить баню от пожароопасной ситуации. После чего на подготовленную площадку устанавливается печь и выбранный бак с необходимым объемом воды.
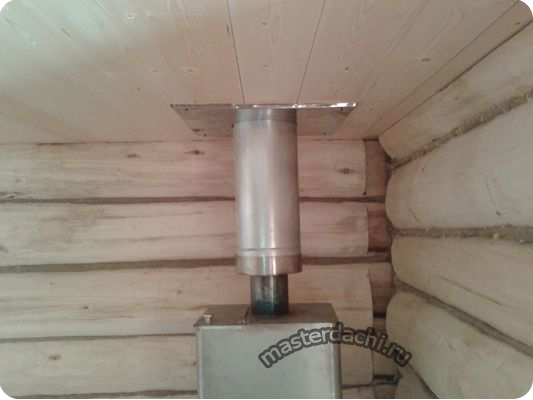
В вырезанное в потолке бани отверстие выводится сэндвич-труба, которая собирается из отдельных элементов толщиной от 0,5 до 1 мм. Труба через отверстие в крышном покрытии выводится наружу, где сэндвич фиксируется и закрепляется с помощью гибкой крызы (или Мастер флеша) для надежной защиты прохода трубы. Стыки и зазоры надежно промазываются герметиком во избежание протечек, а сам Мастер флеш крепится саморезами к профнастилу.
Завершающий этап – установка на трубу зонта для защиты от попадания дождя и снега.
Советы мастера: нюансы работы с печью
- Выбрать в баню идеально подходящую по объему печь крайне легко: для этого необходимо вычислить объем банного домика и умножить на коэффициент 1,5. Полученный результат покажет приблизительный объем печи, которая гарантирует комфортное тепло в домике такого размера.
- Размер бака для воды подбирается по количеству потенциальных посетителей бани и мощности самой печи.
- Лучший материал для печной трубы – кислотостойкая нержавеющая сталь с незначительным содержанием молибдена.
- Несмотря на гарантированную безопасность печи, в банном домике следует хранить исправные средства для экстренного тушения пожара – безопасность человека превыше всего.
Установка печи для бани очень кропотливая и сложная работа, поэтому вам не стоит волноваться, мы профессионально установим вам ее. Вам даже не придется беспокоится «а какую печь выбрать?», мы все эти проблемы возьмем на себя.
«Мастер Дачи» профессионально установит для вас банную печь от 8000 до 25000 Р в зависимости от сложности.
Установка печи при строительстве
Будет интересно:
90000 Top 12 Furnace Problems: Gas Furnace Troubleshooting Guide 90001 90002 90003 90004 90002 A good gas furnace troubleshooting guide assists you in determining what is wrong with the furnace based on its symptoms. Thatâ s what we do here with clear, straightforward information with links to videos where helpful. 90004 90002 You may also like: How to Get the Most From Your HVAC Warranty 90004 90002 Once the problem is diagnosed, see our Gas Furnace Repair Cost Guide for an estimate, assistance in deciding if repairing or replacing the furnace is best based on the circumstances and tips on finding a qualified repair and installation pro.90004 90011 90012 Troubleshooting Common Gas Furnace Problems 90013 90014 90002 Every year, thousands of homeowners ask, â Whatâ s wrong with my gas furnace?  If youâ re in that situation, this guide will arm you with information before you call a furnace company. Knowledge is protection against being taken advantage of â though most repair professionals have sound ethics. 90004 90002 90012 Note: 90013  This guide covers the most common problems, especially those most homeowners can easily check with no tools or basic tools such as screwdrivers and a multimeter.90004 90021 90012 1. The Furnace Wonâ t Start 90013 90024 90002 If nothing happens when the thermostat is set above the homeâ s current temperature, the most likely causes are these: 90004 90027 90028 The furnace switch (located on or near the furnace, looks like a common light switch) is turned off and simply needs to be turned on, though the furnace might have a short delay before starting 90029 90028 The circuit breaker is off, and if the circuit continues to trip after it is turned back on, there is likely a wiring short in the furnace 90029 90028 The thermostat isnâ t set to â heat, â which is easy to check and remedy 90029 90028 The thermostat isnâ t working, and this is sometimes caused by a wire coming loose, so check the wiring connections 90029 90028 The thermostat needs fresh batteries, if battery-powered, or it is bad and must be replaced, an issue that can be diagnosed using an electrical multimeter that shows if a circuit is complete 90029 90028 The filte r is dirty and must be replaced or cleaned, an issue that is especially true on newer furnaces that are equipped to shut down if the filter isnâ t allowing adequate air flow, a condition that can cause serious mechanical failure 90029 90028 The furnaceâ s main circuit board / control board is bad, an issue that can be diagnosed by an HVAC technician is nothing else solves the issue 90029 90042 90021 90012 2.Furnace Blowing Cold Air 90013 90024 90002 If the furnace wonâ t produce heat, you can check to see if it is getting power by moving the fan switch from the â Autoâ position to the â Onâ position . If the fan comes on, then the furnace is getting power. The likely issues then are: 90004 90049 90027 90028 The gas is turned off, so check the gas cock near the furnace to make sure it is parallel to the gas line, its position when the 90029 90028 The gas control valve isnâ t opening and must be replaced 90029 90028 The ignitor is failing and must be replaced 90029 90028 The draft motor isnâ t functioning or the fresh-air intake is blocked, perhaps by snow or debris, and needs to be cleared 90029 90042 90002 Read our detailed post for more info: 90004 90021 90012 3.The Draft Motor Runs, Furnace Wonâ t Start 90013 90024 90002 The draft motor is also called the inducer motor. It pulls hot combustion gases through the furnace and out the exhaust stack. If it starts and then the furnace shuts down, the cause might be: 90004 90027 90028 The motor or the board that controls it has failed and must be replaced 90029 90028 A blocked air intake or blocked exhaust chimney (snow, debris and birdâ s nests are common causes) must be cleared 90029 90028 One of the issues discussed above with gas, gas valve and ignitor must be addressed 90029 90042 90021 90012 4.The Draft Motor Wonâ t Start 90013 90024 90002 The problem, in this case, is either that the motor is bad or the capacitor that supports it is bad. This video will assist you in troubleshooting draft motor issues and what is causing them . 90004 90002 90083 90084 90004 90021 90012 5. The Flame Starts, but the Furnace Shuts Down 90013 90024 90002 If the burner starts making heat but soon shuts off without warming your home, the flame sensor isnâ t working. If the sensor has corrosion on it, sanding it might work, though replacing it is a longer-lasting fix.90004 90021 90012 6. The Blower Wonâ t Shut Off 90013 90024 90002 If the blower motor runs all the time, there are three common issues: 90004 90027 90028 The fan switch on the thermostat is set to â onâ rather than â autoâ 90029 90028 Relays in the control board are stuck in the closed position, so the blower is getting a constant supply of electricity, and the control board must be replaced 90029 90028 The thermostat also has contacts that control power to the furnace, and they can be worn, so the thermostat must be replaced.90029 90042 90002 Hereâ s a video that covers this troubleshooting a furnace blower motor that wonâ t shut off. 90004 90002 90109 90084 90004 90021 90012 7. Why Does the Furnace Keep Shutting Off 90013 90024 90002 If your furnace burner lights but the furnace soon shuts off, there are a few common issues that might cause this: 90004 90027 90028 The furnace filter is dirty and should be cleaned or replaced 90029 90028 The flame sensor isnâ t working and should be replaced 90029 90028 The thermostat is failing 90029 90042 90002 While these are common, there are several other potential causes best diagnosed by a furnace technician. This video gives in-depth coverage to the problem of furnace short-cycling. 90004 90002 90129 90084 90004 90021 90012 8. The Furnace Runs but Canâ t Keep the House Warm 90013 90024 90002 If your furnace is properly sized for your home, then it should keep your home warm even in extreme cold. If it runs constantly but isnâ t providing enough heat, the likely causes are: 90004 90027 90028 A dirty filter that must be washed (only if the washable type) or replaced 90029 90028 The filter is the wrong type for your furnace and restricts airflow, so should be replaced 90029 90028 The filter is installed backwards, an issue that can be checked by looking for the arrows on the filter frame that show proper installation direction with the flow of air 90029 90028 Air ducts are leaking, sometimes producing telltale whistling noises, and it is time to have them sealed as recommended by Energy Star 90029 90042 90021 90012 9.The Furnace Makes Loud Noises 90013 90024 90002 A noisy furnace is most often the result of: 90004 90027 90028 The furnace being a single-stage model that runs on high capacity all the time, so itâ s going to be loud 90029 90028 A bad bearing in the draft motor or the blower motor that must be replaced 90029 90028 A leak in the furnace cabinet, sheet metal plenum or ductwork near the furnace that must be tightened 90029 90028 A dirty filter, which can also cause whistling 90029 90042 90021 90012 10.The Furnace Leaks when AC is Running 90013 90024 90002 Water condenses on the evaporator coil in your furnace, and if it leaks onto the floor, the issue is most likely a clogged drain pan or drain line, an issue covered in our AC Troubleshooting Guide. 90004 90021 90012 11. The Air Coming from the Furnace Smells Bad 90013 90024 90002 Foul odors from the furnace are usually caused by: 90004 90027 90028 A very dirty filter that should be washed, if washable, or replaced 90029 90028 A dead rodent or bird somewhere in the system, usually a job for a professional furnace technician 90029 90042 90021 90012 12.The CO Monitor Going Off 90013 90024 90002 A carbon monoxide alarm should be taken seriously. Turn the furnace off at the thermostat. Donâ t go into the room where the furnace is located. Open doors and windows, and go outside. Call 911 from a cell phone outside your home. 90004 90011 90012 How to Choose a Gas Furnace Repair Expert 90013 90014 90002 Some homeowners choose the cheapest repair service in town, and the results are usually poor. Cheap services are either just getting started, so lack experience or they have a bad reputation, so must give cheap pricing to get jobs.90004 90002 On the other hand, some services are overpriced. The best way to find quality furnace repair at a fair price is to get estimates from several of the top furnace repair companies in town. Meet with each, learn about their history and the experience of the technicians that will do the work. Choose an experienced furnace repair contractor with reasonable rates. You can expedite this process by using our Free Local Estimates service. When you fill out a quick form and submit it, youâ ll soon be contacted by three of the top furnace repair and installation companies near you.They are prescreened for experience, and all are licensed and insured for your protection. 90004 90002 If this guide has helped you diagnose a furnace repair issue, consider passing it along on social media to friends and followers that might have furnace issues too! 90004 90002 Related Article: Furnace Replace and Installation Cost Guide 90004 90049.90000 Washing and Bathing 90001 By: Jo Johnson — Updated: 28 Feb 2020 | * Discuss 90002 Washing and bathing are the most important ways of maintain good health and protecting ourselves from infections, illnesses and ailments. 90003 90002 Maintaining cleanliness is also important for our self-confidence, physical and emotional well-being. The main purpose of washing is to remove dirt and odours. 90003 90002 The frequency of bathing or showering is very individual and may be dependent on culture; food and water will always take priority over personal hygiene.Skin care and healthcare professionals recommend that the face, underarms and genitals are cleansed once a day and not more often, as this can take essential natural oils away from the skin leading to irritation.Hand-washing should be carried out frequently throughout the day, as they come into contact with many potentially harmful bacteria. 90003 90008 Bathing or Showering? 90009 The choice of whether to use a bath or a shower is very individual and each has its own benefits. Bathing can be an excellent way of relaxing and enjoying some quiet time.Special substances and oils may be added to help relaxation or to improve the quality of our skin. Bathing is a good way for parents to spend some quality time with their children and can be a way of ensuring there is some one-to-one interaction. 90002 The steam created from a bath can help open the pores and loosen the dirt from the tiny glands of the skin, aiding in their removal. 90003 90002 If your body is heavily soiled for example after playing outdoors sports, it may be beneficial to have a shower instead of or before a bath so that residual dirt is not left on the skin.90003 90002 Showering can be invigorating and increase energy levels. Dirt is washed away immediately and it is generally thought that a shower uses less water than a bath. 90003 90008 Products 90009 90018 90019 Try to use products with a neutral pH to avoid the skin becoming too dry. 90020 90019 Moisturise after washing to ensure skin remains hydrated. 90020 90019 Rinse the bath after use, especially if an oil has been added so as to reduce risks of slipping for the next user. 90020 90019 The use of a massaging device can help increase circulation to the surface of the skin, improving the overall health of our external appearance.90020 90027 90008 Drying 90009 All persons should have their own towel that is washed after each use. Bacteria can multiply on a moist towel and infections can be spread easily. 90002 Skin should be patted dry, not rubbed so as to lessen irritation and so there is some water retention on the skin, decreasing the risk of dry skin occurring. 90003 90008 Health and Safety 90009 Those who are physically or mentally disabled will need assistance with their hygiene needs. Carers should maintain their privacy and dignity at all times and ensure that there are no obvious drafts.90002 Babies should be bathed as per the techniques taught by the midwife or health-visitor. Always check the temperature of the water before using so as to avoid burns or shock from overly cold water. 90003 90002 Use non-slip mats to avoid accidents especially with young children and the elderly. Wash genitals from front to back, to avoid rectal germs spreading into the vagina. 90003 90002 It is advisable to bath or shower prior to admission to hospital for a surgical procedure to remove potentially harmful bacteria from the skin that may infect a wound.90003 90002 Avoid dry skin by having warm, not hot water, as this can dehydrate the skin. 90003 90002 Washing with sponges and flannels may be best avoided as these items can transfer bacteria to and from different and unfamiliar areas, causing infection risks to be higher. Sufficient cleansing can be achieved using just the hands. If flannels etc are used, every individual should have their own and these should be replaced regularly. 90003 90002 Washing and bathing is a very individual issue.Daily attention to our body is the best way of avoiding odours, germs and infections. The choice of whether to wash at a sink, use a bath or a shower is down to individual preference. 90003 90002 You might also like … 90003 90002 Share Your Story, Join the Discussion or Seek Advice .. 90003 you already know Joma Tech never showers 90002 Mathew — 28-Feb-20 @ 11:20 AM 90003 This is stupid if the water does not drain you can not be as clean as a shower i rate this one star 90002 vanss — 8-Dec-19 @ 10:38 PM 90003 I am looking for anything that will tell me if leaving soaking wet flannels in the bathroom will encourage bacteria more quickly than if they are wrung out.I always wring mine out but my mum’s carers leave hers soapy and dripping wet. Good or bad? 90002 SnowyOwl2000 — 23-Aug-19 @ 2:01 AM 90003 Want to know more about the health and heigen. 90002 Munna — 19-Oct-18 @ 7:24 AM 90003 I personally was looking for the benefits of personal hygiene and why it is important to shower and bath daily … But I mean this has been kinda useful I guess. Thanks -Saffron 90002 Saffy — 4-Jun-18 @ 1:49 AM 90003 90002 Title: 90003 Miss Ms Mrs Mr Dr Rev’d Prof.Other 90002 (never shown) 90003 90002 Validate: 90003 .90000 Boiling Water Bath Canning — Food in Jars 90001 90002 90003 90004 90002 For years, there has been a something missing from this site and that was a post that detailed the basics of boiling water bath canning. I did not do it in the very beginning and then, as time went on, I felt a little embarrassed about writing that kind of post so late in the game. Whenever people would ask me for it, I would refer them to other websites. However, I’m happy to finally be filling in that gap with this post here today.90004 90002 90008 90004 90002 So, a little disclaimer to start out with. I’m going to detail my particular canning workflow. This might not be exactly how you do it in your kitchen and that’s okay. We all find ways to make it work with the tools, equipment and space that we have. In the end, the most important things are that you get your jars hot, that you fill them to the proper headspace, and that you process them for the amount of time prescribed by your recipe. There’s a good deal of flexibility in the rest of the details.90004 90002 90013 90004 90002 As I mentioned in the first post in this series, any pot can be your canning pot as long as it’s tall enough to hold a rack and your jars, and that it allows the jars to be fully submerged in the water. I like this one, but the best pot to use is the one already in your kitchen. Once you’ve picked out your pot, position a rack in the bottom. I have a silicone trivet pictured here, but any round rack, collection of old canning jar rings or a hand towel will work.Then put your jars in the pot. 90004 90002 90018 90004 90002 Then, fill up the jars and pot with water. I like to use the hottest tap water available, as it speeds up the boiling process a bit to start. 90004 90002 90023 90004 90002 It’s a little hard to see in this picture, but at this point, I only fill the pot enough to just barely cover the tallest jar I’m using. This should be more than enough water for the processing stage, because once you lower your filled jars in the pot, they will displace enough water to sufficiently cover the jars (sometimes, you need to remove a little water from the pot to prevent overflow.If this becomes necessary, use something heatproof, like a Pyrex measuring cup so that you do not burn yourself). 90004 90002 90028 90004 90002 It is always a good idea to pour a generous glug of white vinegar into your canning pot before you start heating it. This will prevent any minerals present in your water from depositing on your canning pot or jars. I do not live in a place with particularly hard water, but I still do this because it keeps my pot in good shape and makes it easier to clean.90004 90002 90033 90004 90002 Now the pot is ready to go on the stove an come to a boil. I do all of this before I ever apply heat to my preserves. That way, the canning pot has a head start on my product and the jars will be nice and hot when I’m ready to use them. 90004 90002 90038 90004 90002 90041 Here’s where my practice diverges a little from what the canning books will tell you. Almost all instructions (even those printed in my cookbook), will instruct you to take out a small saucepan, place the lids in it, cover them with water and bring it to a very gentle simmer.While this is good in theory (you do not want to over soften the sealing compound), I rarely do it in practice. 90042 90004 90002 90041 Instead, I watch my heating canning pot. When it reaches a boil, I turn it down to a simmer and drop my lids in. Everything stays nice and hot until I need to use it. The sealing compound gets to the perfect level of softness and I am a happy canner. 90042 90004 90002 Recently, the experts at Ball Canning announced that it’s no longer necessary to simmer lids prior to canning, as the Plastisol sealant does not require softening.Instead, just make sure to wash your lids in warm, soapy water before applying them to filled jars. More information about this can be found here. 90004 90002 90051 90004 90002 When the product is ready to go into the jars, I slide the canning pot off the heat and pull out the jars with a handy jar lifter. Just a note: These jars are hot, but not sterilized, because I turn the heat down to a simmer as soon as the pot boils. This works because the filled jars get boiled for at least ten minutes (and often longer) during the processing step.90004 90002 However, if your recipe calls for a processing time that is shorter than ten minutes, you either need to increase the processing time to ten minutes, or you need to actively boil your jars for at least ten minutes before filled, to ensure you have sterilized jars. 90004 90002 90058 90004 90002 Now you fill up your jars, leaving the amount of headspace required by your recipe. If the recipe does not tell you how much headspace to leave, go for approximately 1/2 inch. That’s typically enough for most products.90004 90002 90063 90004 90002 Before applying the lids and rings, wipe the rims with a damp paper towel (I use the hot water from the canning pot as my dampening water, as the heat helps remove any stubborn sticky spots. If your product is super sticky, a little white vinegar on the cleaning cloth will help). 90004 90002 Then, center a lid on each jar and secure it with a ring. Do not over tighten the rings, because there needs to be enough space for the oxygen in the jars to escape. The term for this level of tightening is called «finger tip tight» meaning that you only tighten as much as you can with the tips of your fingers.I always tell my canning students that you turn just until the ring meets resistance. 90004 90002 90070 90004 90002 Once all the jars have lids and rings, lower them into your canning pot. Make sure the jars are fully submerged and are covered with about an inch of water (you need that much to ensure that they will not become exposed during boiling). Turn the burner to high. When the pot returns to a boil, set a a timer to the prescribed amount of processing time. 90004 90002 You do want to maintain an active boil throughout the processing of the jars, but make sure you control your boil.If the pot is madly rolling, the chances that you will burn yourself increase. Turn it down a little, to minimize splashing and injury. 90004 90002 90077 90004 90002 When time is up, turn off the heat. If you have an electric stove that stays hot for a while, slide the pot off the burner. You do not want the water to be rolling when you reach in with your jar lifter. Then, lift your jars out of the pot and place them on a folded kitchen towel to cool (if you have countertops made from marble, granite, stainless steel or some other surface that stays cool, the towel is really important so that you don ‘ t shock your jars).90004 90002 If you find that your product is leaking out of the jars when you pull them out of the canner, put the jars back in the water and let them cool gradually in the pot for five to ten minutes. One of the reasons that liquid loss occurs is that rapid cooling causes a powerful pressure differential that can forces product out of the jars. By letting your jars cool more slowly, you reduce the force of pressure and more product stays where you want it. 90004 90002 90084 90004 90002 Once the jars are out of the canner, leave them alone and let them cool.Hopefully, you’ll hear a symphony of popping and pinging lids. This is good, it means that the seals are being formed. However, do not freak out if you do not hear those noises. Jars sometimes seal slowly and quietly. Once the jars are cool enough to handle, remove the rings and test the seals by holding onto the edges of the lids and lifting up an inch or two. If the lids hold fast, the seals are good. 90004 90002 Sealed jars should be stored in a cool, dark place without the rings. If the jars are at all sticky after processing, make sure to wash them before you put them away.Any sticky residue can attracts ants and other pests, so make sure your jars are squeaky clean. 90004 90090 Like this: 90091 90002 Like Loading … 90004 90090 Related Posts: 90091.90000 Is water-only best for bathing my baby? 90001 You can wash your baby with just water if you want to. Some babies love being in warm water, and a bath can become an enjoyable ritual for you both. However, there’s no need to give your baby a bath every day during the first month or so. In fact, doing so could dry out your baby’s skin. 90002 You may think that water-only baths are the gentlest way to keep your baby’s skin clean, especially when he’s very young. In fact, a lot depends on whether you live in a soft water or a hard water area.It may also depend on whether you have a family history of eczema and whether your baby has signs of dry skin. 90003 90002 Within a few weeks of birth, your baby’s skin surface changes from a neutral pH to an acid pH. This acidic film on the surface of the skin is called the acid mantle. It acts as a barrier to protect your baby’s skin. 90003 90002 Water-only baths work best if you live in a soft water area because the water also has an acidic pH. Hard water has an alkaline pH. If you live in a hard water area, washing your baby with just water may disturb the acid mantle of your baby’s skin and dry it out.Hard water has been linked to higher rates of eczema in babies, compared with soft water areas. 90003 90002 If you live in a hard water area, it may be a good idea to use a mild, liquid baby cleanser or use sensitive, fragrance-free baby wipes. These products are very gentle and should not upset the natural chemical balance of your baby’s skin. 90003 If your baby’s skin looks dry, you could use a little bath emollient in the water. Emollients are skin softeners or smoothers that help the skin to retain water.They moisturise dry skin, reduce scaling, soften cracks in the skin and reduce itching. 90002 Be aware that some emollients in the water can make your baby slippery to handle. There are bath supports that may help you to hold your baby more securely, such as bath hammocks, mats or foam inserts. 90003 90002 Remember that while bath supports are helpful, never leave your baby alone in one, not even for a second. Babies can drown silently in as little as 5cm (2in) of water. 90003 90014 If your baby’s skin is still dry, you can smooth on a moisturiser suitable for baby skin, after using an emollient in the bath.There are different sorts of emollients to choose from, including creams and lotions. Ask your pharmacist for bland medical emollients and avoid any perfumed products. 90002 On non-bath days, you could just top and tail your baby to keep him clean. 90003 90002 If your baby has atopic eczema, a daily bath with medical emollients and leave-on emollients used as soap substitutes is important, as it will restore your baby’s skin barrier. Be sure to pat your baby’s skin dry before moisturising his skin after his bath.90003 90002 When it comes to cleaning your baby’s genitals and bottom, water alone may not be enough. Baby poo has a higher percentage of fats than adult poo. You may need to use a mild, liquid baby cleanser or baby wipes to remove the fatty deposits from your baby’s skin. This will help prevent nappy rash. 90003 90002 Again look for baby wash products, such as sensitive, fragrance-free and alcohol-free baby wipes. These will be less likely to disrupt your baby’s natural skin barrier. If you’re not sure about using a product, you could try it on a small test area of your baby’s skin to see if it causes any problems.90003 90002 Here are some other tips you can follow to protect your baby’s skin: 90003 90025 90026 Give your baby a bath when you think he needs one, perhaps no more than two or three times a week. After the first month or so, a bath can become a part of your baby’s bedtime routine. 90027 90026 If you want to bath your baby regularly, you could alternate baths using a mild, liquid baby cleanser or bath emollient with water-only baths, particularly if you live in a hard water area. 90027 90026 If your baby’s skin looks dry, smooth on a baby moisturiser or a medical emollient a couple of times a day.It’s best to use a bland emollient. 90027 90032 90014 Has your baby suddenly taken a dislike to baths? Get tips on helping him enjoy bathtime again. 90002 Last reviewed: May 2018 90003 .